


A tips to show the work flow : Fbx Humanoid animation import into Animator.
after import Animation into Unity3D humanoid rig, and switch to “Animation” tab, you will find following display.
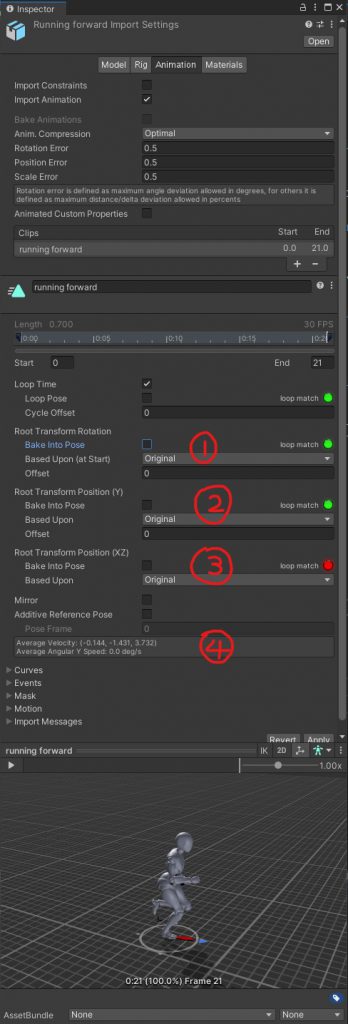
In this screen, you need to design how the animation import into unity3d,
1,2,3,4 are showing the Rootmotion data read from fbx.
- Root Transform Rotation – (section 1)
this are control the rotation of this animation, in this case you can see
section 4, “Average Angular Y Speed: 0.0 deg/s“, which mean this animation clip without any rotation change after 1 cycle. - Root Transform Position (Y) – (section 2)
this are control the vertical displacement (Y-axis) of this animation clip.
in this case you can see section 4’s “Average Velocity” in Y axis field : “-1.431”.
which mean this animation will MOVE UP a 1.431 for each cycle.
since this animation should be moving forward, shouldn’t have any Y-axis movement,
you can say this is noise from animation or blending issue.
SOLUTION 1 : Check “Bake Into Pose” option in (section 2),
then Unity will blend to 0 after each cycle complete.
SOLUTION 2: use the offset and carefully enter the number to correct the displacement on section 4, if you do it correctly you should see zero value.
e.g. (-0.144, 0, 3.732) - Root Transform Position (XZ) – (section 3)
thise are control the Horizontal displacement (XZ-axis) of this animation clip.
in this case you can see section 4’s “Average Velocity” on both X & Z axis
-0.144 = X axis, 3.732 = Z axis
it seem normal at first look, however this are also glitch, since this animation clip are moving forward, it should not have any X axis change.
so it’s either the init rotation angle was wrong or the animation in raw file had deviation.
SOLUTION : you should check “Bake into Pose” on section 1 that should fix the glitch and section 4’s -0.144 will be gone.
So let’s talk about animator – locomotion
and setup a simple locomotion as follow.

Section 1, is the example locomotion setup, we use “Local X” & “Local Z” to streaming the local movement to the animator,
and animator will use those data to blending the animation between all those { idle, forward, left, right, backward }
so the foot placement will be merge and looks like sync with the character movement.
Section 2, why we using “1.5” on the locomotion mapping ? because the animation clip’s Average Velocity told us, the animation will moved 1.572 (forward). and other animations { backward, left, right } are similar to these value.
so let use it as the reference.
after that the Animator should able to blend those Animation perfect depend on the input stream.
and here is how you do it in programming side